Building Your First Node App With Express And PostgreSQL


 Hi awesome reader, I welcome you to this beautiful tutorial on how to build a simple CRUD APP with
Express and PostgreSQL.We are going to start from scratch. Thereby, will finish the needed requirements to have a fully functional application.
Hi awesome reader, I welcome you to this beautiful tutorial on how to build a simple CRUD APP with
Express and PostgreSQL.We are going to start from scratch. Thereby, will finish the needed requirements to have a fully functional application.
Required Softwares PostgreSQL.Download Source: postgresql.org/download PgAdmin.Download Source: pgadmin.org/download
About PostgreSQL(From Their Official Website) PostgreSQL is a powerful, open-source object-relational database system that uses and extends the SQL language combined with many features that safely store and scale the most complicated data workloads. The origins of PostgreSQL date back to 1986 as part of the POSTGRES project at the University of California at Berkeley and has more than 30 years of active development on the core platform.
About pgAdmin: pgAdmin is a Graphical User Interface Software for the PostgreSQL database which make development faster, standardized, and less stressful.
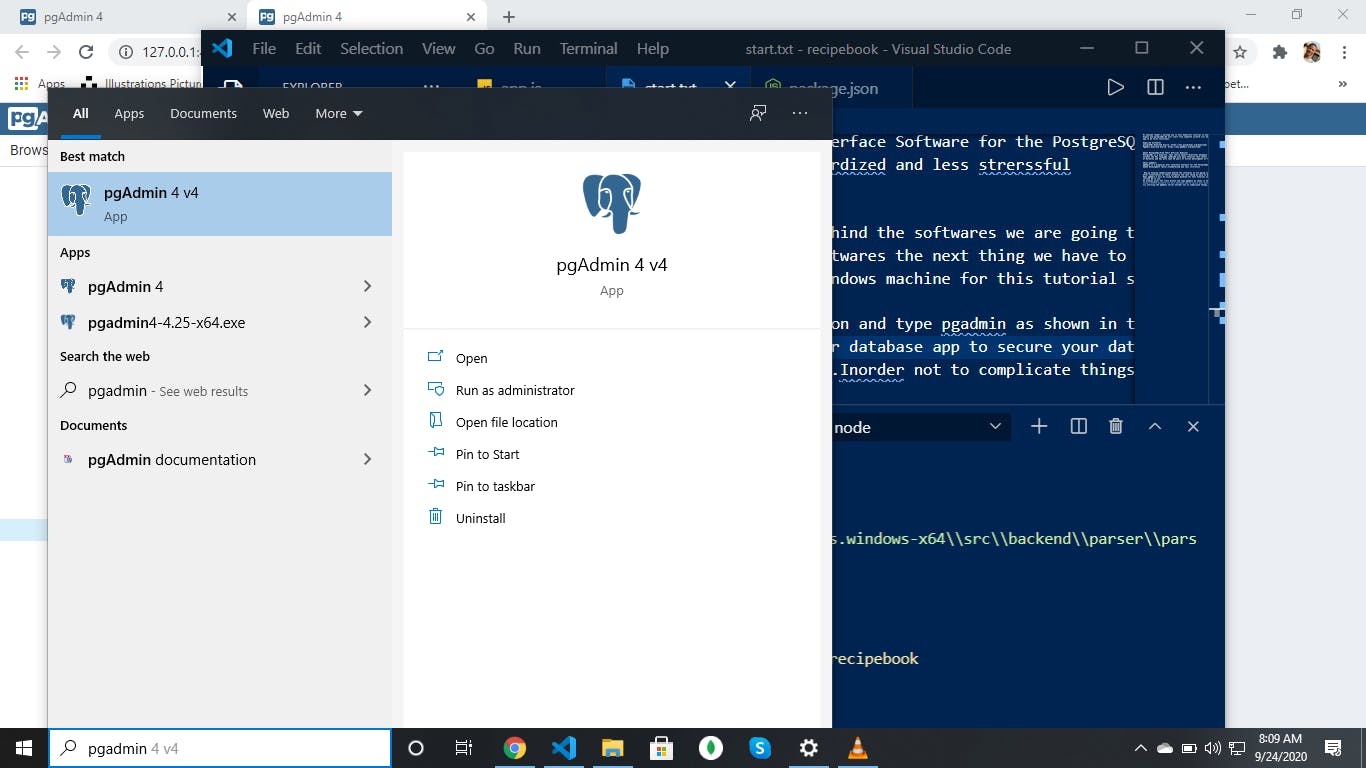
Now, we know the philosophy behind the software we are going to use, let's not waste much time and begin development. After Installation, of the software the next thing we have to do is; Open pgAdmin, I will be using a windows machine for this tutorial so how to start the software may differ based on the current OS in use. On windows, press the start button and type pgAdmin as shown in the above screenshot below.
Click on it and wait for the server to start(In your web browser). Setup a MASTER password for your database app to secure your databases. Remember to save this password somewhere because you will be asked to provide it each time you try starting the pgAdmin server. You can choose to use the same password for both the MASTER password and your POSTGRES database password to prevent complications.
After setting up our database's password and because we've got access, we can then, create a new database called recipedb.
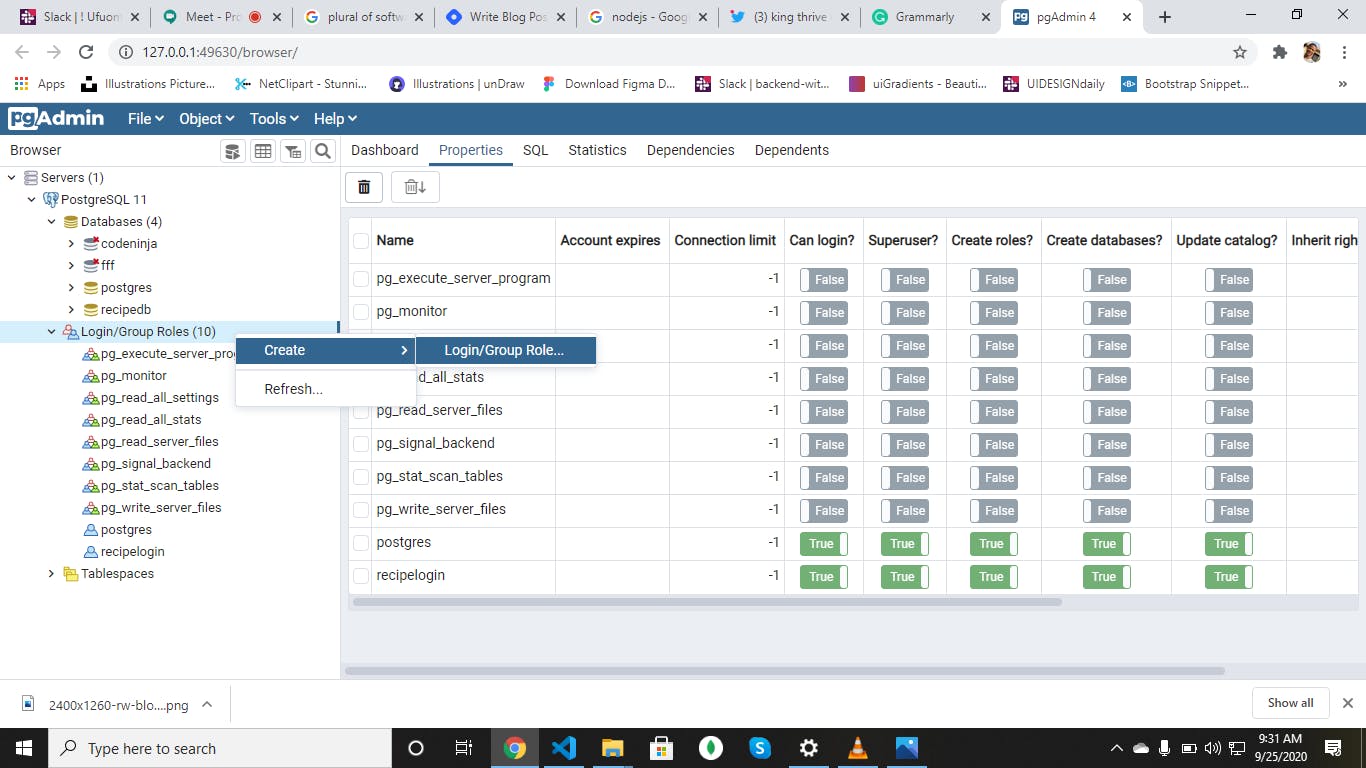
After doing that, we can proceed and define our database. Let's create our login role first, Navigate through the side nav and right-click on Login/Group Roles. Hover on Create and click on Login/Group Role as shown below.
Now, under General, where you see Name, write recipelogin. Where you see Password, write any password for your loginrole, under Privileges you must select these: Can Create Database, Can Create roles, And Superuser.
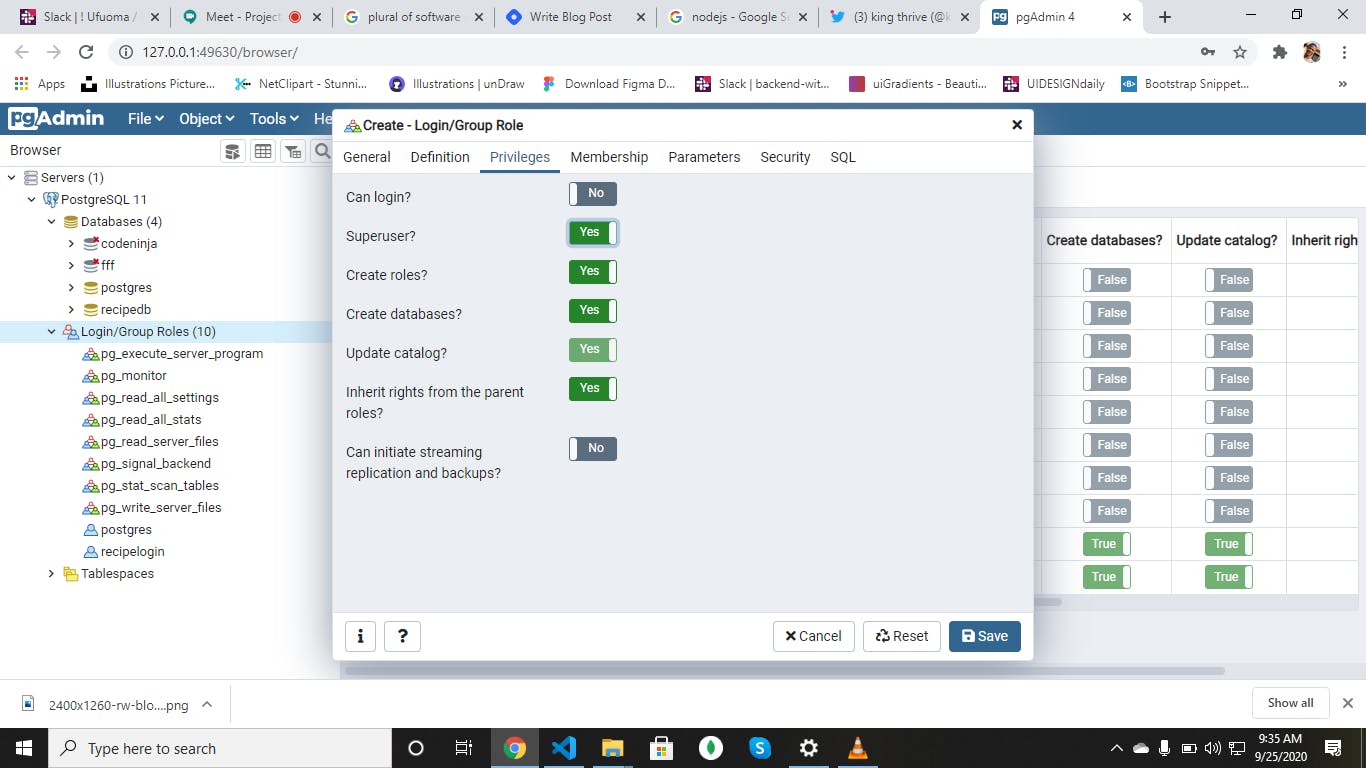 Now press save after saving, you should see something like this
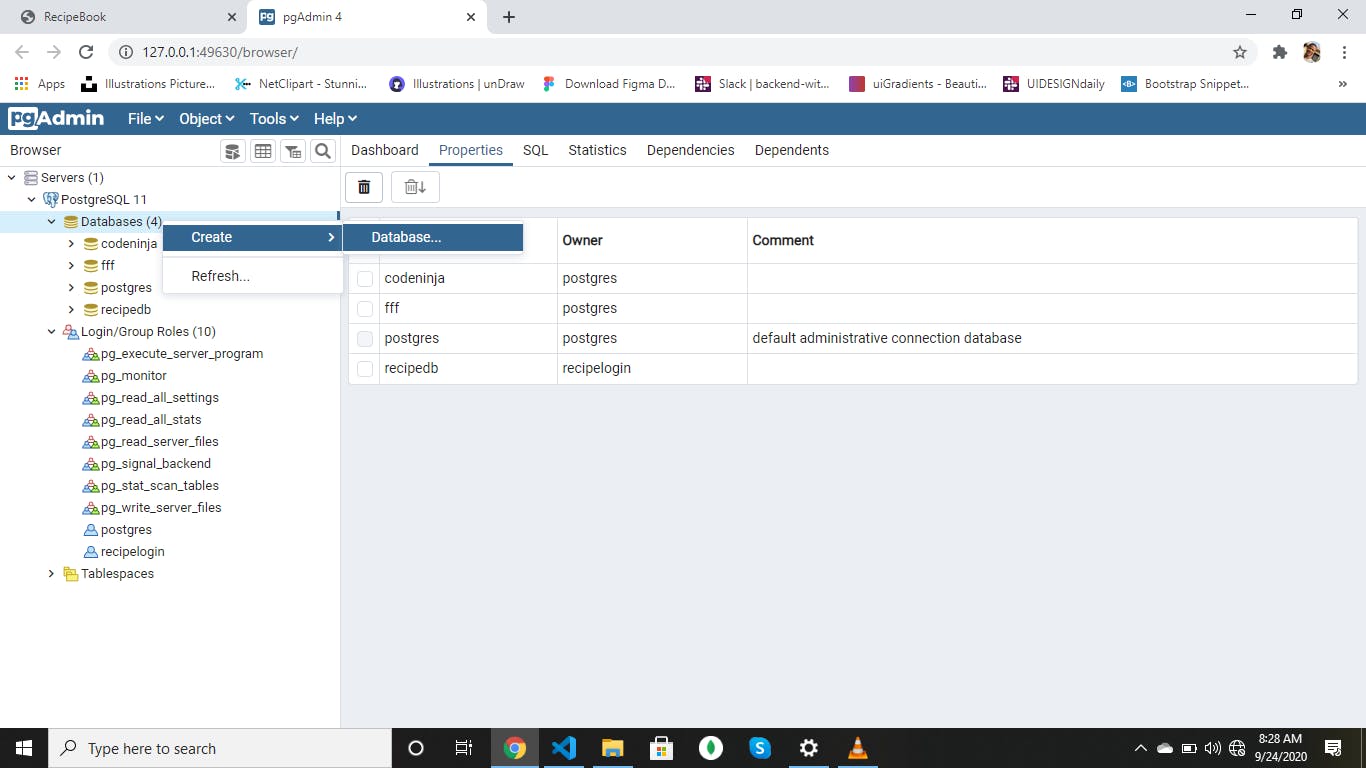
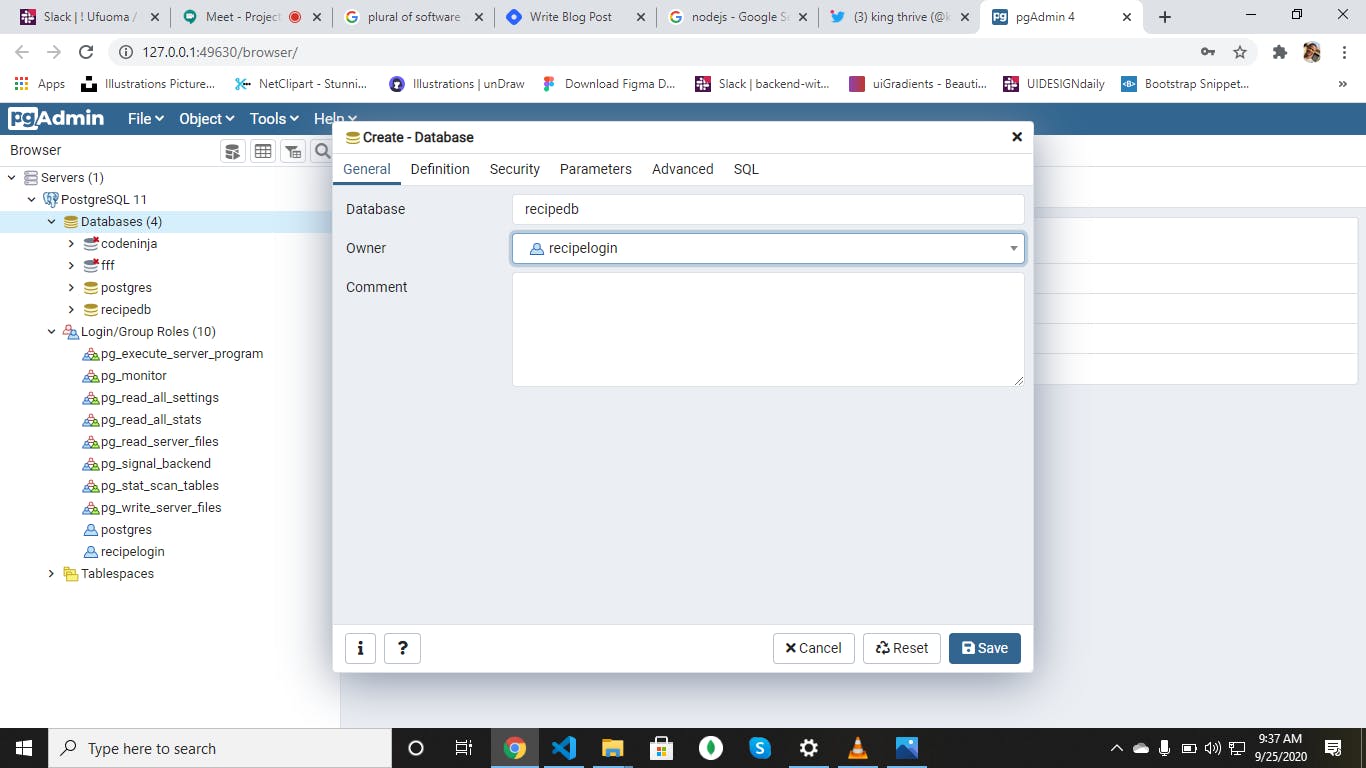
Let's create our database now, go to databases under the PostgreSQL 11 found at the top-left corner of the sidenav.Rightclick on the databases and hover on Create, Now click on Database. Under General, where you see Database , write this recipedb. Where you see Owner, select the owner you created just before this step which is recipelogin in my case, press save to create your database.
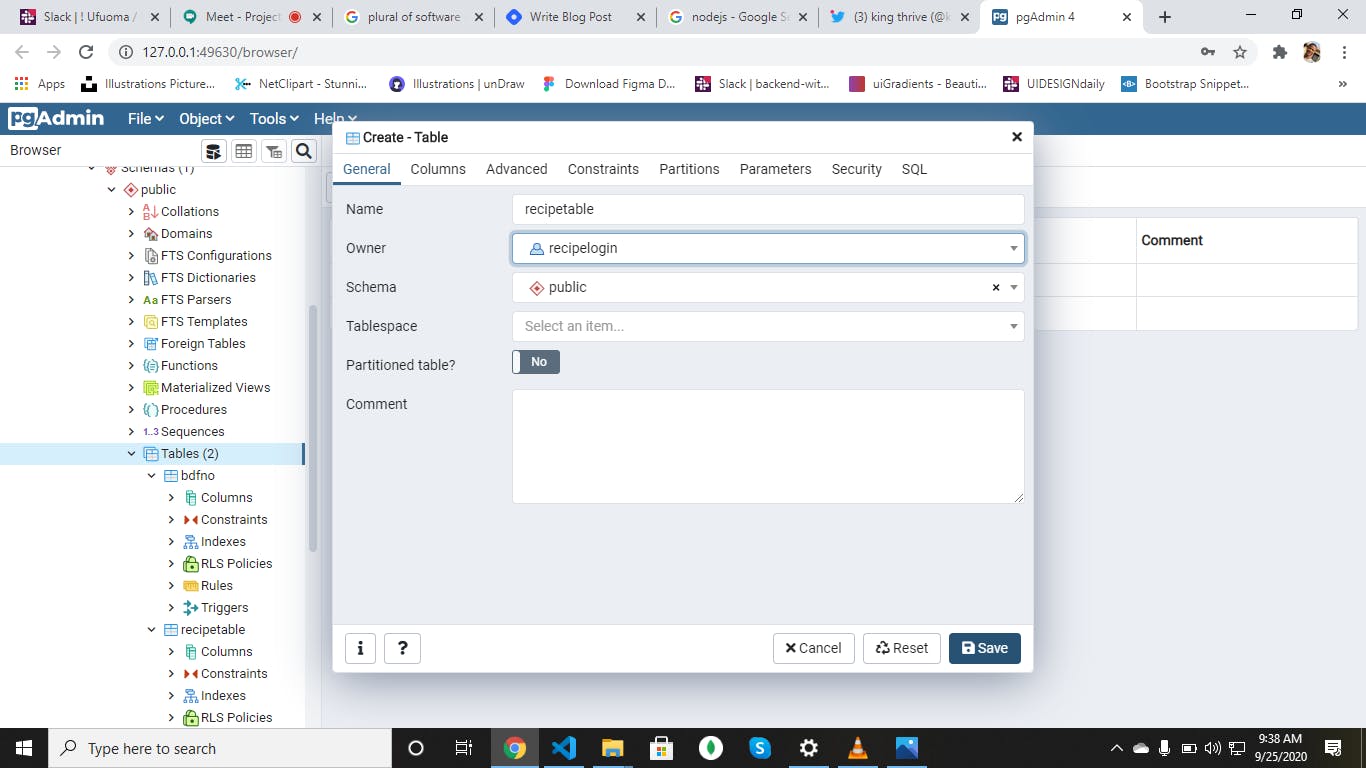
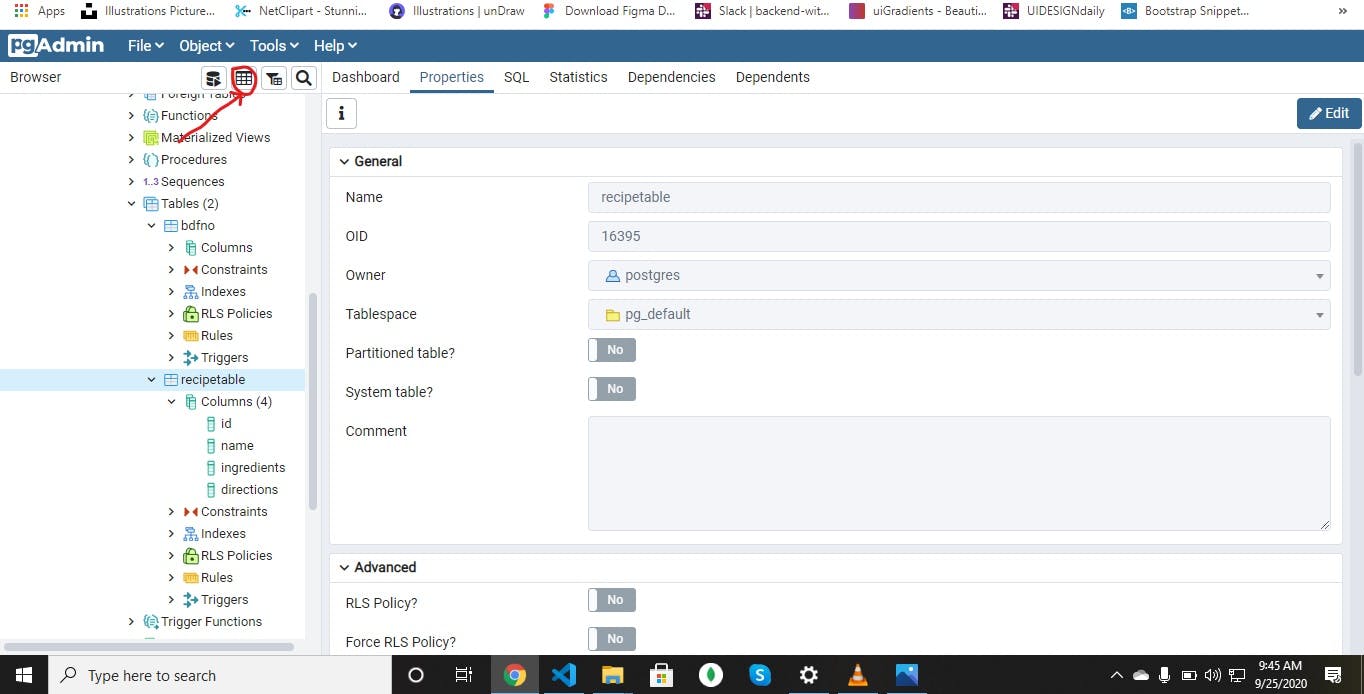
Open your newly created database, navigate to schemas, under the schemas,right-click on Tables, hover on Create, and Click on Table to create a new table. Under General, where you see name, type recipetable. Make sure the Owner be the owner you created and used for the database. Click on save to save the table.
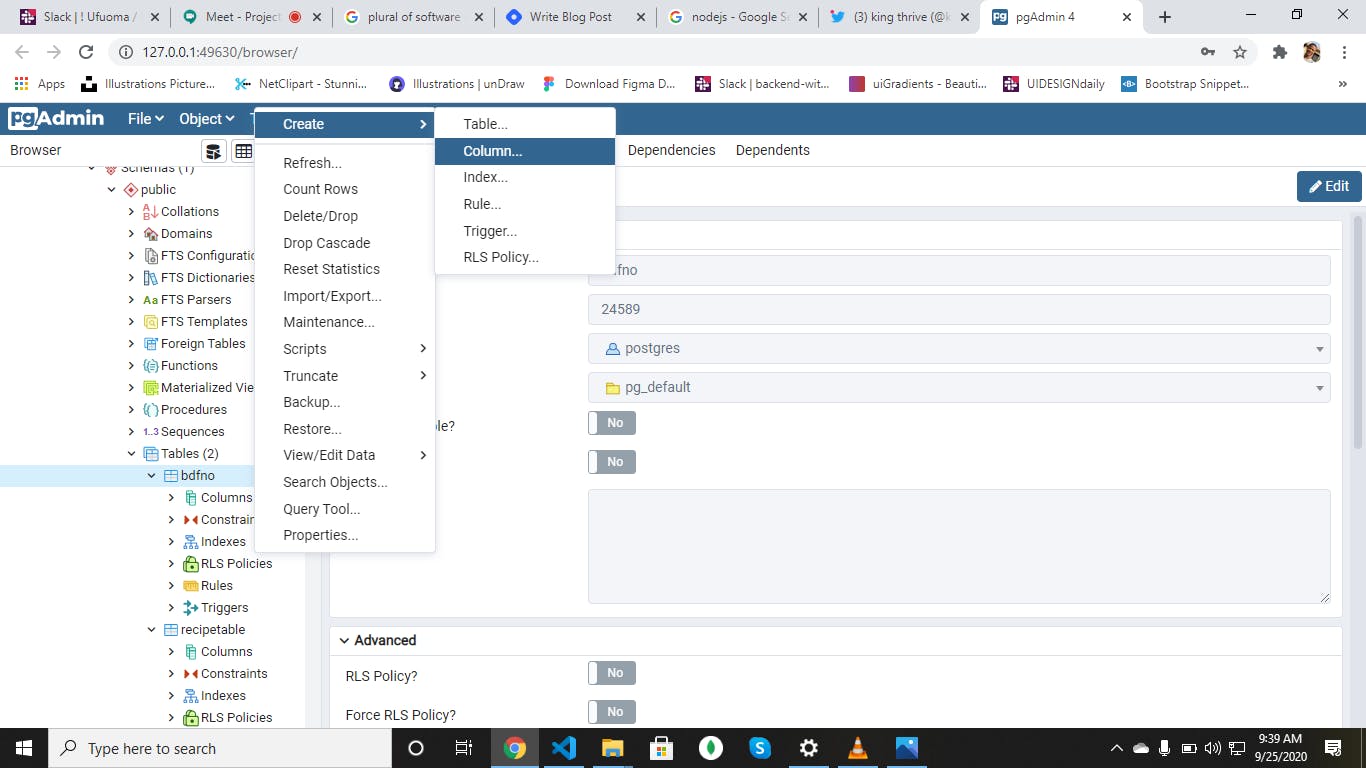
Now, right-click on the new table you created, hover on create and select column.
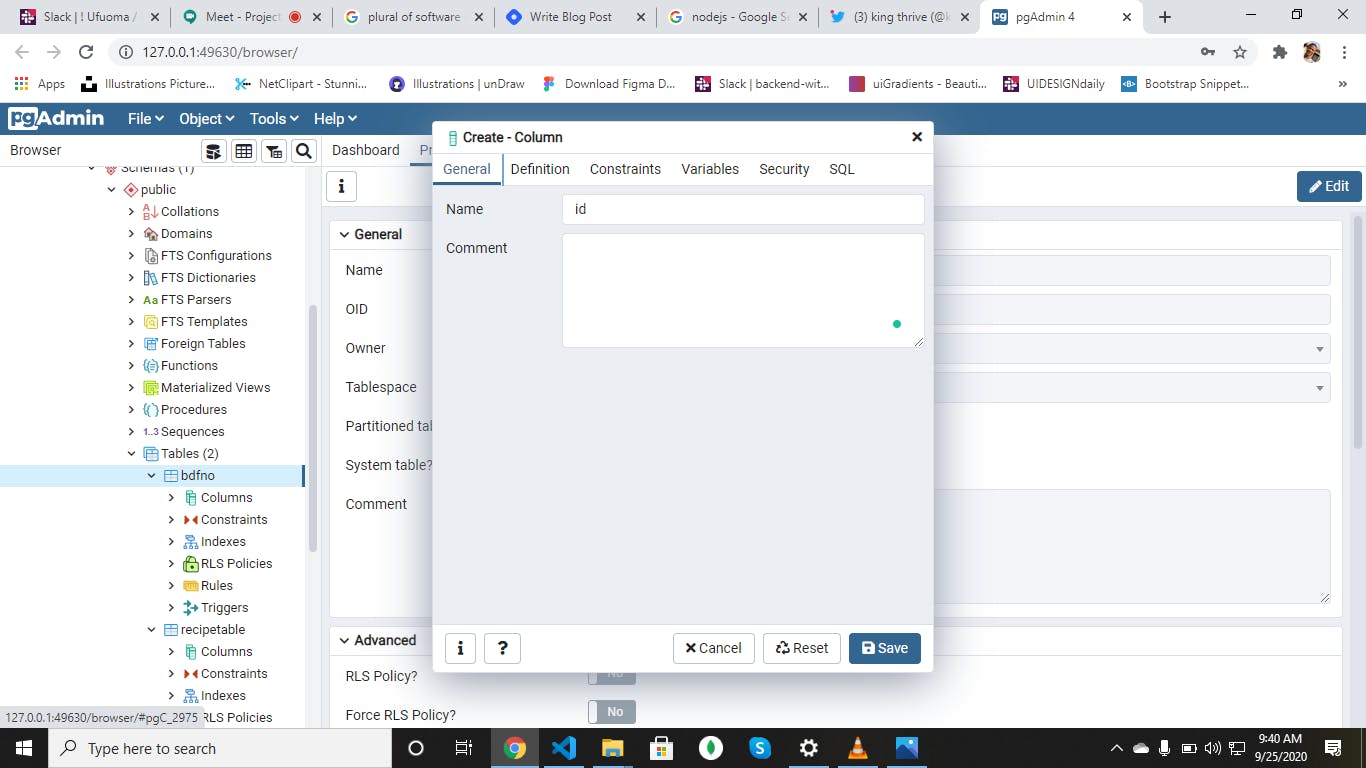
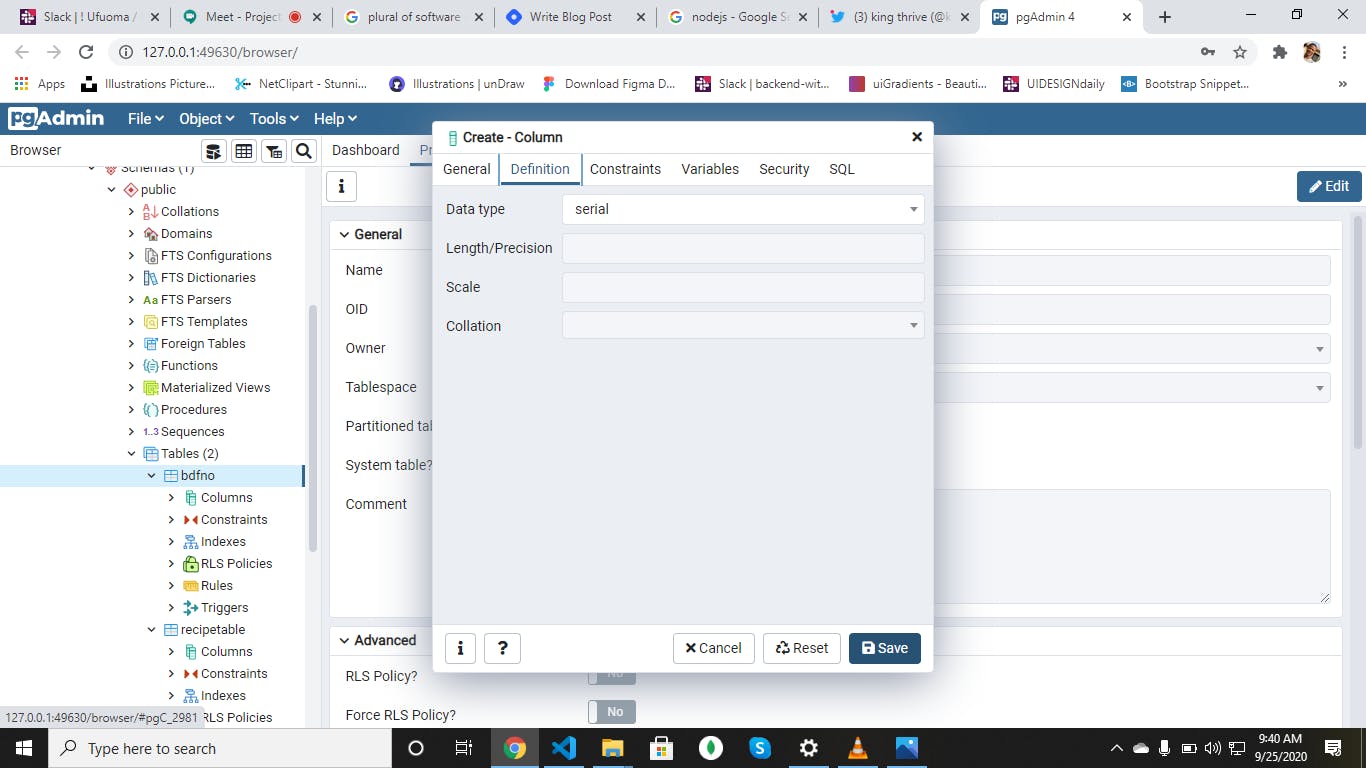
 Under general, where you see Name, write id. Under Definitions, where you find Datatype, select serial(for autoincrement). Click on save to save your new column.
Use this same process and create a new column called name with a datatype of character, and a length of 255. Do another column with the name ingredients and datatype of text, note that under datatypes, there is text and there is also text[], select text, not text[] Now, do the last column with the name of directions and a datatype of text.
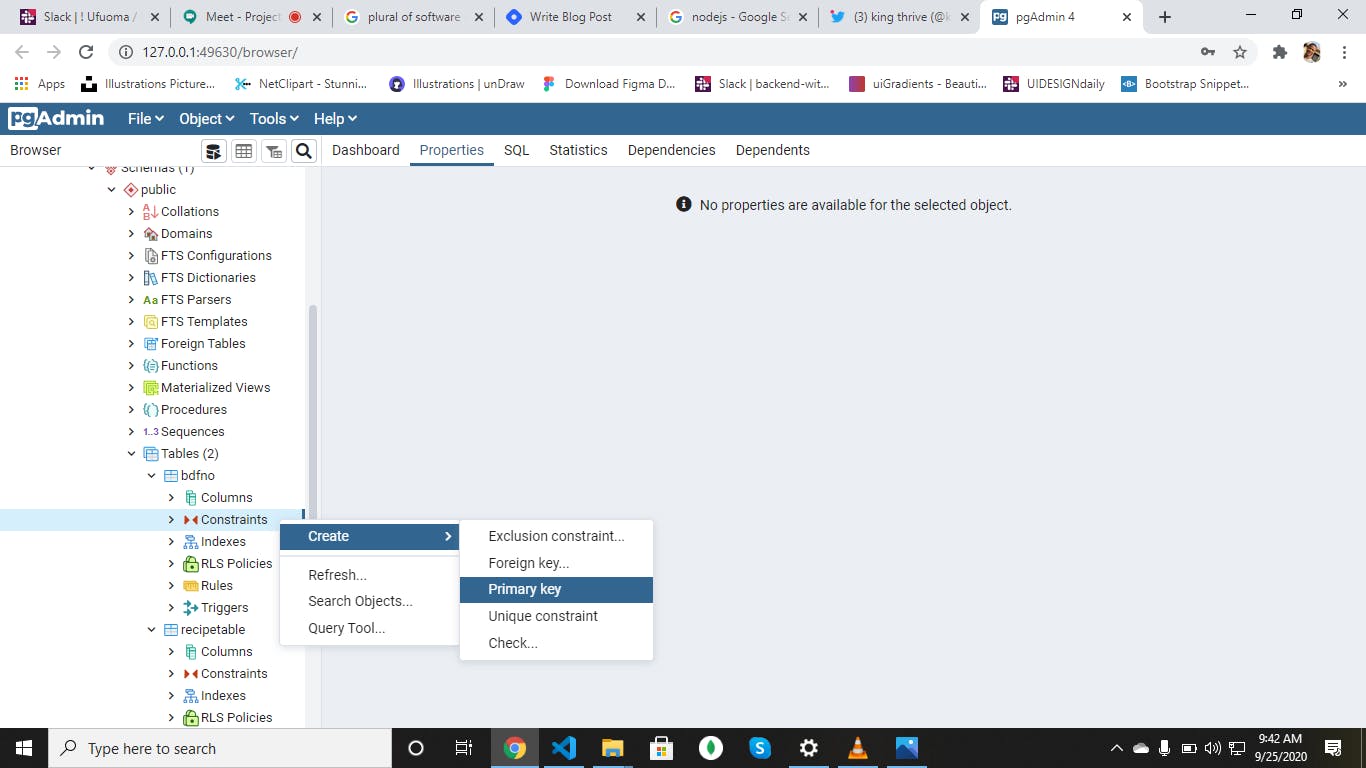
Moving forward, we will have to make the column with name id as our primarykey, in order to do that; we first have to look for Constraints under the recipetable we created,right-click on it and hover on Create and select Primary Key. Under General, Skip all the input fields there and move to Definitions, Under columns, you select the id you created. Press save.
Inputting Data Into Our Database
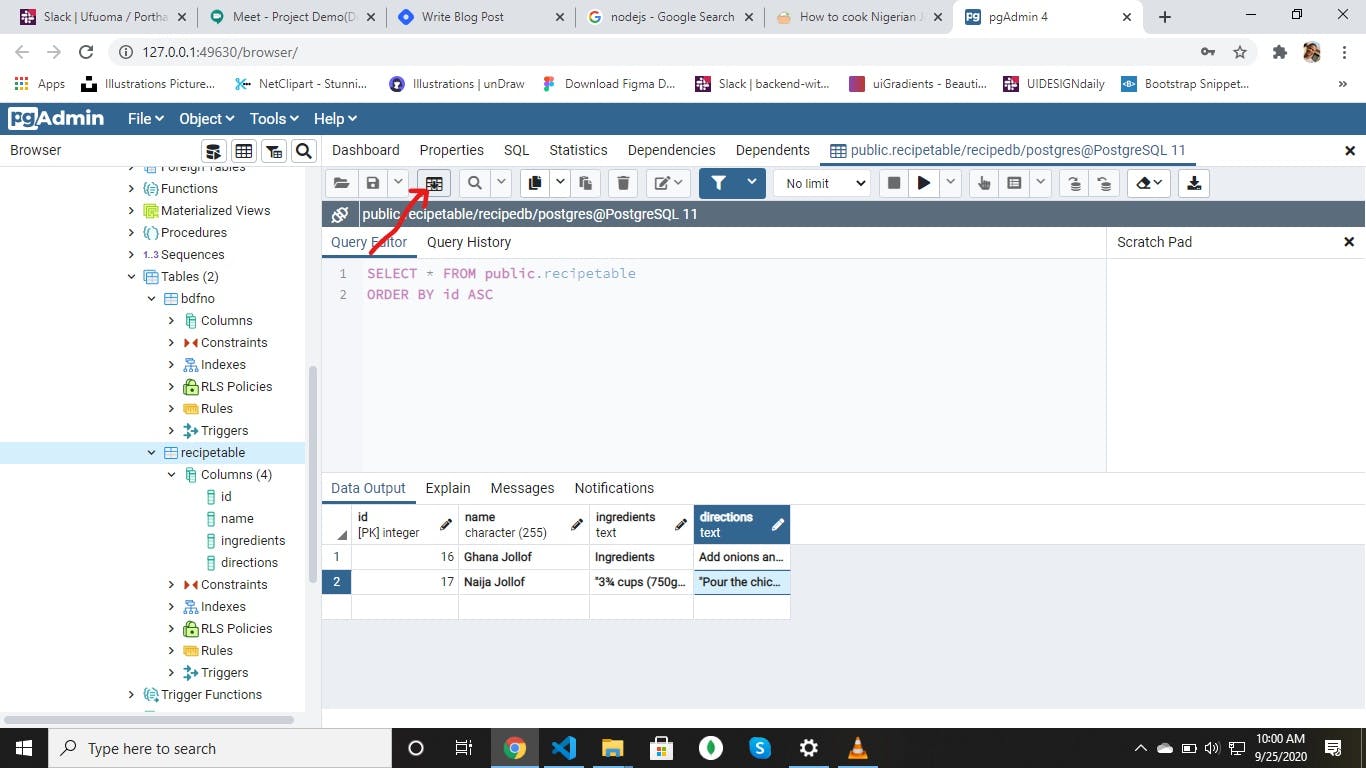
Doing this with pgAdmin is really simple, Lets do this!. Click on the recipetable you created and click that icon.
After clicking on it, go ahead and insert your data as I did below and press on that icon to save your data.
Isn't it simple to use pgAdmin? let's have more fun by coding.
In your Commandline, change the directory to where you want to have your project's folder. Create a new folder called recipe book in my case. Open that folder up in your preferable text editor. create a new file called package.json and paste this
{
  "name": "recipebook",
  "version": "1.0.0",
  "description": "recipe manager",
  "main": "app.js",
  "scripts": {
    "start": "nodemon app"
  },
  "author": "King Thrive",
  "license": "ISC",
  "dependencies": {
    "body-parser": "*",
    "consolidate": "*",
    "dust": "*",
    "dustjs-helpers": "*",
    "dustjs-linkedin": "*",
    "express": "*",
    "pg": "^4.5.7"
  }
}
now run
npm i -g nodemon after installing nodemon globally, run npm i To install all the dependencies required for this project. ->express is a minimal and flexible Node.js web application framework that provides a robust set of feature for mobile and web applications ->path module provides utilities for working with file and directory paths. ->bodyParser is used to parse incoming request bodies in a middleware(which we will do later) available under the req.body property ->consolidate is used to consolidate our dust template engine which makes working with dust much flexible and easy to use. ->dust is an asynchronous templating engine for browser and node js ->pg is simply a PostgreSQL client for Node.js ->nodemon is a tool that helps in developing node.js apps by automatically restarting the server each time changes are made to the application
Go ahead and create these folders within the recipe book folder public, views.
You should have three(3) folders now.That is node_modules,public and views lets create these files in addition to the package,jsom file already created(Within the recipebook folder) app.js,README.md now in app.js,code this:
var express = require('express'),
    path = require('path'),
    bodyParser = require('body-parser'),
    cons = require('consolidate'),
    dust = require('dustjs-helpers'),
    pg = require('pg'),
    app = express();

app.get('/',function(req,res){
    res.send('Index route is working!')
})
// Server
app.listen(5050, function(){
    console.log('Server started on port 5050');
});
save your app.js file
now run,
npm start. If you succeed without any errors, you should see this
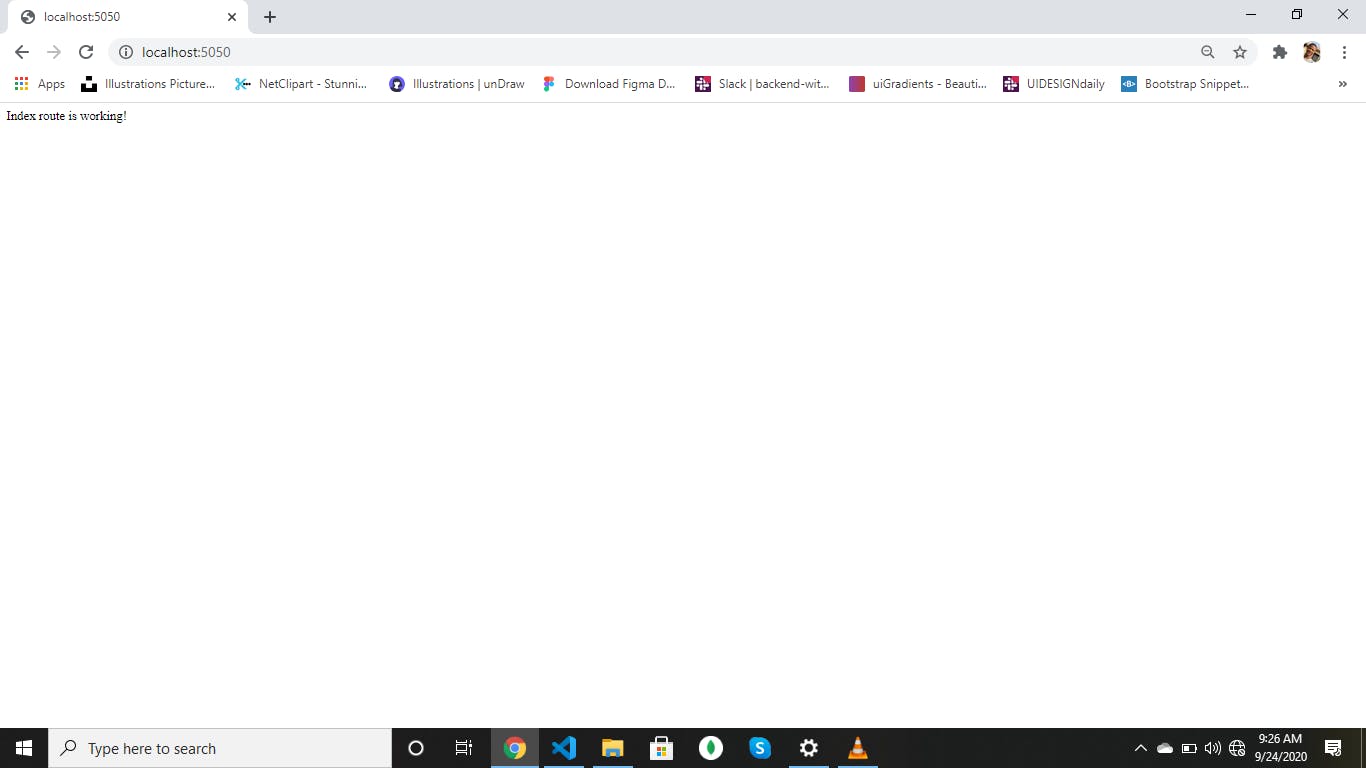 congratulations to anyone who made it through, our index router is now working on port 5050.
Let's move, we are now going to connect to our database created at the start of this project. To do this, write the codes below(In your app.js file, delete everything and replace it with the codes below)
congratulations to anyone who made it through, our index router is now working on port 5050.
Let's move, we are now going to connect to our database created at the start of this project. To do this, write the codes below(In your app.js file, delete everything and replace it with the codes below)
var express = require('express'),
    path = require('path'),
    bodyParser = require('body-parser'),
    cons = require('consolidate'),
    dust = require('dustjs-helpers'),
    pg = require('pg'),
    app = express();

// DB Connect String
var connect ="postgres://username:password@localhost/recipedb";

// Assign Dust Engine to .dust files
app.engine('dust', cons.dust);

// Set Default Ext .dust
app.set('view engine', 'dust');
app.set('views', __dirname + '/views');

// Set Public folder
app.use(express.static(path.join(__dirname, 'public')));

// Body Parser Middleware
app.use(bodyParser.json());
app.use(bodyParser.urlencoded({ extended: false}));

app.get('/', function(req, res) {
  pg.connect(connect, function(err, client, done){
    if (err) {
      return console.error('error fetching client from pool', err);
    }
    client.query('SELECT * FROM recipetable', function(err, result) {
      if (err) {
        return console.error('error running query', err);
      }
      done();
      res.render('index', {recipes: result.rows});
    });
  });
});

// Server
app.listen(5050, function(){
    console.log('Server started on port 5050');
});
on this line, var connect ="postgres://username:password@localhost/dbname"; edit the username to your Postgres database username which is Postgres by default and change the password to your Postgres password, and lastly the dbname to the database you created already.
Moving forward, we assigned the dust template engine to the .dust file by doing this:
app.engine('dust', cons.dust);
app.set('view engine', 'dust'); app.set('views', __dirname + '/views');
Setting up our public folder. What we did was with the help of the path module, we were able to connect our directory name to the public folder by doing this:
app.use(express.static(path.join(__dirname, 'public')));
We went ahead and added our bodyParser middleware to our app.js file by doing this:
// Body Parser Middleware
app.use(bodyParser.json()); app.use(bodyParser.urlencoded({ extended: false}));
Lets break the first route down,firstly we did a get request with a request and response paremeter,then went ahead and coded this:
pg.connect(connect, function(err, client, done){
    if (err) {
      return console.error('error fetching client from pool', err);
    }
    client.query('SELECT * FROM recipetable', function(err, result) {
      if (err) {
        return console.error('error running query', err);
      }
      done();
      res.render('index', {recipes: result.rows});
    });
on this line,
pg.connect(connect, function(err, client, done){}
we used the pg variable with a method called connect and passed in the connect variable which has our database host and configurations, we then went ahead and added a callback function that has three(3) parameters,that is err,client, and done parameters.
What this,
if (err) {
      return console.error('error fetching client from pool', err);
    }
    client.query('SELECT * FROM recipetable', function(err, result) {
      if (err) {
        return console.error('error running query', err);
      }
      done();
      res.render('index', {recipes: result.rows});
    });
does is if there is an error, the error will be logged in the console else if there is no errors, then we bring our done() function then on the res.render(), what we were doing was we should render the recipes on the index. dust file that we will create in a jiffy now, in your public folder, create three(3) folders. css->For our CSS codes fonts->For our fonts js->for our javascript codes
In your fonts folder, download these files and paste it in the fonts folder. This folder has glyphicons files Fonts Link => mediafire.com/file/r1vbz0uv21y5vx0/fonts.zi..
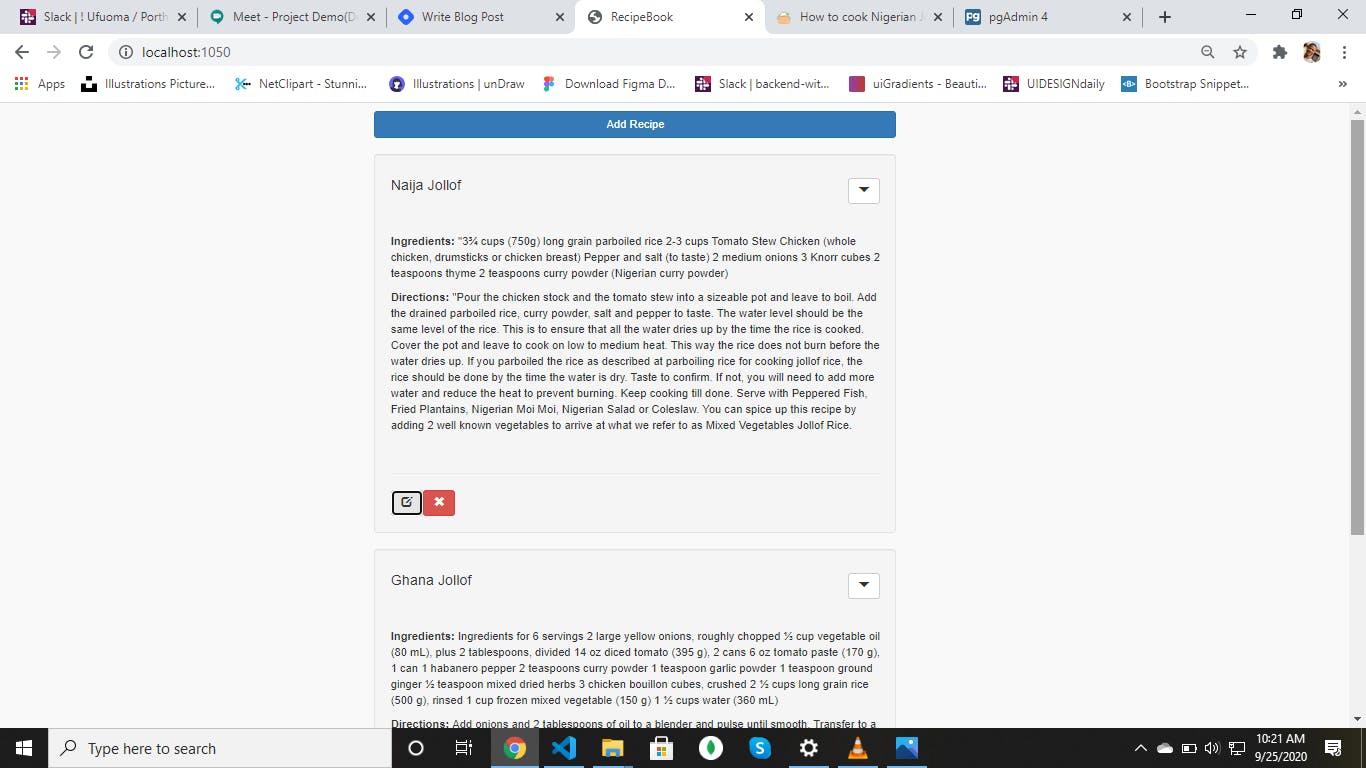
Leave that directory and come to your views folder and create two(2) files namely; index.dust and layout.dust in our index.dust file, paste these codes;
{>"layout" /}
{<body}
<button type="button"
class="btn btn-primary btn-block"
data-toggle="modal"
data-target="#formModal"
>Add Recipe
</button>
<br />
{#recipes}
<div class="well">
<h4>{name}
<button
class="btn btn-default pull-right"
data-toggle="collapse"
href="#recipe_{id}"
aria-expanded="false"
aria-controls="recipe_{id}"
>
<span class="glyphicon glyphicon-triangle-bottom" aria-hidden="true"></span>
</button>
</h4>
<div class="collapse" id="recipe_{id}">
<br />
<br />
<p><strong>Ingredients: </strong>{ingredients}</p>
<p><strong>Directions: </strong>{directions}</p>
<br />
<hr />
<button class="btn btn-default edit-recipe"
          data-toggle="modal"
          data-target="#editFormModal"
          data-id="{id}"
          data-name="{name}"
          data-ingredients="{ingredients}"
          data-directions="{directions}"
        >
          <span class="glyphicon glyphicon-edit" aria-hidden="true"></span>
        </button>
<button class="btn btn-danger delete-recipe" data-id="{id}">
<span class="glyphicon glyphicon-remove" aria-hidden="true"></span>
</button>
</div>
</div>
{/recipes}
<!-- add model -->
<div class="modal fade" tabindex="-1" role="dialog" id="formModal" aria-labelledby="formModalLabel">
<div class="modal-dialog" role="document">
<div class="modal-content">
<form method="post" action="/add">
<div class="modal-header">
<button type="button" class="close" data-dismiss="modal" aria-label="Close"><span aria-hidden="true">×</span></button>
<h4 class="modal-title">Add Recipe</h4>
</div>
<div class="modal-body">
<div class="form-group">
<label>Recipe Name</label>
<input type="text" class="form-control" name="name" />
</div>
<div class="form-group">
<label>Ingredients</label>
<textarea class="form-control" name="ingredients"></textarea>
</div>
<div class="form-group">
<label>Directions</label>
<textarea class="form-control" name="directions"></textarea>
</div>
</div>
<div class="modal-footer">
<button type="button" class="btn btn-default" data-dismiss="modal">Close</button>
<input type="submit" class="btn btn-primary" value="Save" />
</div>
</form>
</div><!-- /.modal-content -->
</div><!-- /.modal-dialog -->
</div><!-- /.modal -->
<!-- edit model -->
<div class="modal fade" tabindex="-1" role="dialog" id="editFormModal" aria-labelledby="editFormModalLabel">
<div class="modal-dialog" role="document">
<div class="modal-content">
<form method="post" action="/edit">
<input type="hidden" id="edit-form-id" name="id" />
<div class="modal-header">
<button type="button" class="close" data-dismiss="modal" aria-label="Close"><span aria-hidden="true">×</span></button>
<h4 class="modal-title">Edit Recipe</h4>
</div>
<div class="modal-body">
<div class="form-group">
<label>Recipe Name</label>
<input type="text" class="form-control" name="name" id="edit-form-name"/>
</div>
<div class="form-group">
<label>Ingredients</label>
<textarea class="form-control" name="ingredients" id="edit-form-ingredients"></textarea>
</div>
<div class="form-group">
<label>Directions</label>
<textarea class="form-control" name="directions" id="edit-form-directions"></textarea>
</div>
</div>
<div class="modal-footer">
<button type="button" class="btn btn-default" data-dismiss="modal">Close</button>
<input type="submit" class="btn btn-primary" value="Save" />
</div>
</form>
</div><!-- /.modal-content -->
</div><!-- /.modal-dialog -->
</div><!-- /.modal -->
{/body}

I know you are confused at this point, don't be you will get me in a second. What is happening in this file is we are saying that for each recipe that we defined in our app.js file as res.render('index', {recipes: result.rows}); we should display the recipe's name in an h4 tag
and with this;
Ingredients: {ingredients}
Directions: {directions}
we should display the Ingredients and directions in a strong tag within a paragraph tag.
we went ahead and did a button to edit recipe by writing this;
<button class="btn btn-default edit-recipe"
data-toggle="modal"
data-target="#editFormModal"
data-id="{id}"
data-name="{name}"
data-ingredients="{ingredients}"
data-directions="{directions}"
>
<span class="glyphicon glyphicon-edit" aria-hidden="true"></span>
</button>
We did another button too for deleting recipe by doing this:
`
`
We went ahead and added a modal which when clicked will display the specific recipe we want to edit with its content, we did this with javascript ajax which we will define later in our js folder That is what is happening here;
<!-- edit model -->
<div class="modal fade" tabindex="-1" role="dialog" id="editFormModal" aria-labelledby="editFormModalLabel">
<div class="modal-dialog" role="document">
<div class="modal-content">
<form method="post" action="/edit">
<input type="hidden" id="edit-form-id" name="id" />
<div class="modal-header">
<button type="button" class="close" data-dismiss="modal" aria-label="Close"><span aria-hidden="true">×</span></button>
<h4 class="modal-title">Edit Recipe</h4>
</div>
<div class="modal-body">
<div class="form-group">
<label>Recipe Name</label>
<input type="text" class="form-control" name="name" id="edit-form-name"/>
</div>
<div class="form-group">
<label>Ingredients</label>
<textarea class="form-control" name="ingredients" id="edit-form-ingredients"></textarea>
</div>
<div class="form-group">
<label>Directions</label>
<textarea class="form-control" name="directions" id="edit-form-directions"></textarea>
</div>
</div>
If you guys will remember, at the onset of our index.dust file we did this;
<button type="button"
    class="btn btn-primary btn-block"
    data-toggle="modal"
    data-target="#formModal">Add Recipe</button>
This is simply a button which when clicked will display a modal for adding a new recipe to the recipes already in the database. And this is that modal;
<!-- add model -->
<div class="modal fade" tabindex="-1" role="dialog" id="formModal" aria-labelledby="formModalLabel">
<div class="modal-dialog" role="document">
<div class="modal-content">
<form method="post" action="/add">
<div class="modal-header">
<button type="button" class="close" data-dismiss="modal" aria-label="Close"><span aria-hidden="true">×</span></button>
<h4 class="modal-title">Add Recipe</h4>
</div>
<div class="modal-body">
<div class="form-group">
<label>Recipe Name</label>
<input type="text" class="form-control" name="name" />
</div>
<div class="form-group">
<label>Ingredients</label>
<textarea class="form-control" name="ingredients"></textarea>
</div>
<div class="form-group">
<label>Directions</label>
<textarea class="form-control" name="directions"></textarea>
</div>
</div>
<div class="modal-footer">
<button type="button" class="btn btn-default" data-dismiss="modal">Close</button>
<input type="submit" class="btn btn-primary" value="Save" />
</div>
</form>
</div><!-- /.modal-content -->
</div><!-- /.modal-dialog -->
</div><!-- /.modal -->
Let's move to the next step, open the layout.dust file you created already and code this;
<!DOCTYPE html>
<html>
<head>
  <title>RecipeBook</title>
  <link rel="stylesheet" type="text/css" href="/css/bootstrap.css">
  <link rel="stylesheet" type="text/css" href="/css/style.css">
</head>
<body>
  <div class="container">
    <div class="row">
      <div class="col-md-7 col-md-offset-2">
        {+body /}
      </div>
    </div>
  </div>
  <script src="https://code.jquery.com/jquery-2.2.4.js" integrity="sha256-iT6Q9iMJYuQiMWNd9lDyBUStIq/8PuOW33aOqmvFpqI=" crossorigin="anonymous"></script>
  <script type="text/javascript" src="js/bootstrap.js"></script>
  <script type="text/javascript" src="js/main.js"></script>

</body>
</html>
What this does is,it is the main layout of our page that renders different pages to our website with the help of {+body/} In the head tag we did this:
RecipeBook
which is simply the normal way we add stylesheets to our Html templates. In the body tag too, we added some bootstrap classes to make our work easier
{+body /}
And lastly,before the tag, we added our javascript files,that is jquery,bootstrap and main.js files
Please always save what we are doing, I do not usually save manually that is why I forgot to tell you, you can do the same, just use Visual Studio Code 😍😍😍.
Back to our app.js file,modify it to this:
var express = require('express'),
    path = require('path'),
    bodyParser = require('body-parser'),
    cons = require('consolidate'),
    dust = require('dustjs-helpers'),
    pg = require('pg'),
    app = express();

// DB Connect String
var connect ="postgres://postgres:343817@localhost/recipedb";
// const connecT="postgres://postgres:343817@localhost/recipedb";

// Assign Dust Engine to .dust files
app.engine('dust', cons.dust);

// Set Default Ext .dust
app.set('view engine', 'dust');
app.set('views', __dirname + '/views');

// Set Public folder
app.use(express.static(path.join(__dirname, 'public')));

// Body Parser Middleware
app.use(bodyParser.json());
app.use(bodyParser.urlencoded({ extended: false}));

app.get('/', function(req, res) {
  pg.connect(connect, function(err, client, done){
    if (err) {
      return console.error('error fetching client from pool', err);
    }
    client.query('SELECT * FROM recipetable', function(err, result) {
      if (err) {
        return console.error('error running query', err);
      }
      done();
      res.render('index', {recipes: result.rows});
    });
  });
});

app.post('/add', function(req, res) {
  pg.connect(connect, function(err, client, done){
    if (err) {
      return console.error('error fetching client from pool', err);
    }
    client.query('INSERT INTO recipetable(name, ingredients, directions) VALUES ($1, $2, $3)',
      [req.body.name, req.body.ingredients, req.body.directions]
    );
    done();
    res.redirect('/');
  });
});

I think we all know whet the first rout does, lets move to the second route, that is the POST route.
What we did was, we instructed our system to do this to the database each time a user posts to this route(That is the /add route)
As usual, we added a callback function with a request and a response parameter.
In the callback function, we did this;

pg.connect(connect, function(err, client, done){
    if (err) {
      return console.error('error fetching client from pool', err);
    }
    client.query('INSERT INTO recipetable(name, ingredients, directions) VALUES ($1, $2, $3)',
      [req.body.name, req.body.ingredients, req.body.directions]
    );
    done();
    res.redirect('/');
  })

We all know that before you can have access to the database, you have to connect to it first, so we will connect to our database again then,
if there is an error, we handle that error and if there isn't we go ahead and do this;

client.query('INSERT INTO recipes(name, ingredients, directions) VALUES ($1, $2, $3)',
      [req.body.name, req.body.ingredients, req.body.directions]
    );
    done();
    res.redirect('/');
We used our client parameter declared in the callback function,the client parameter has a method called query,for querying from the database of course but this time, instead of querying recipes, we are rather adding recipes, how did we do it? I will tell you how.
We said the system should INSERT INTO recipetable a name, an ingredient, and directions with these values ($1, $2, $3), don't worry, these scary numbers are just placeholders for our
[req.body.name, req.body.ingredients, req.body.directions] which was parsed from the form modal with the help of body-parser If all we want to do is successful, the user should be redirected to the homepage, that is why we did this; res.redirect('/');
Add this to your app.js file under the /add route you created, is nothing but a simple edit route we are about to create.
app.post('/edit', function(req, res) {
  pg.connect(connect, function(err, client, done){
    if (err) {
      return console.error('error fetching client from pool', err);
    }
    client.query('UPDATE recipes SET name=$1, ingredients=$2, directions=$3 WHERE id=$4',
      [req.body.name, req.body.ingredients, req.body.directions, req.body.id]
    );
    done();
    res.redirect('/');
  });
});
Note: Let this come before the listening app event. That should always be last.
What we did in this route is, we said that the system should process this database query if the user of our app goes to the edit route. As usual, we did a pg.connect to connect to our database, then moving forward, we handled any error that might come our way and if there is no error, then we will use the client parameter in our callback function to query from the database in this case, updating what already exists.
'UPDATE recipes SET name=$1, ingredients=$2, directions=$3 WHERE id=$4',
    [req.body.name, req.body.ingredients, req.body.directions, req.body.id]
What this simply means is that we should update name, ingredients, and directions with the id of the current recipe in question, we also got this with the body-parser by getting the name, ingredients, directions, and id from our form Modal. But am sure when testing this route, you will have a problem, you won't be able to see the content in the database that you want to edit, you can achieve this by doing this in your js folder found in the public directory.
Now, open the public folder move click ok the js folder created already, now create two(2) files, one for bootstrap.js and the other for main.js. Download the bootstrap.js file from here and paste it to make it simple for you because the codes are chaffy, don't get scared after seeing it, you don't need to know what's going on there
Download Link=> mediafire.com/file/xx2n30lglbd1ka2/bootstra..
back to our main.js file,paste this;
$(document).ready(function(){
    $('.delete-recipe').on('click', function(){
    var id = $(this).data('id');
    var url = "/delete/" + id;
    if (confirm('Delete Recipe?')){
      $.ajax({
        url: url,
        type: 'DELETE',
        success: function(){
          console.log('deleting recipe');
          window.location.href='/';
        },
        error: function(err) {
          console.log(err);
        }
      });
    }
  });
  $('.edit-recipe').on('click', function(){
    $('#edit-form-name').val($(this).data('name'));
    $('#edit-form-ingredients').val($(this).data('ingredients'));
    $('#edit-form-directions').val($(this).data('directions'));
    $('#edit-form-id').val($(this).data('id'));
  });
});
this will help in getting the already existing recipe content from the database onto our modal for editing,
if you did this right, you should be able to update any recipe without any errors.
Now back to our app.js file ,lets create a delete route.Paste this:
app.delete('/delete/:id', function(req, res){
  pg.connect(connect, function(err, client, done){
    if (err) {
      return console.error('error fetching client from pool', err);
    }
    client.query('DELETE FROM recipetable WHERE id = $1',
      [req.params.id]
    );
    done();
    res.sendStatus(200);
  });
});
so if a user goes to the delete route that is /delete/: id, the :id is a placeholder for the id of the the recipe we want to delete, the app.delete() has a callback function that has a request and response, We went ahead and did a connection with a pg.connect that takes a connect variable and a callback function that has (err, client, done) parameters
And if there is an error, we handle the error and if there is not we use this query:
'DELETE FROM recipetable WHERE id = $1',
      [req.params.id]
to delete from the recipetable with the help of the id we parsed with req.params.id
Test your routes(CRUD), and if all works, Congratulations!!!🎉🎉. You finally did your first CRUD app with node and Postgres, I hope to see you soon in my next article. Happy Coding👨🏽💻.